|

STRESS MEASUREMENT OF PLASTIC
Stress measurement of rigid medical trays made from EASTAR(r) PETG 6763 copolyester can help manufacturers optimize their processing conditions, while reducing cycle times and product failures. Eastman Chemical Company, as a service to its customers, will aid in the installation and start-up of stress measurement instrumentation.
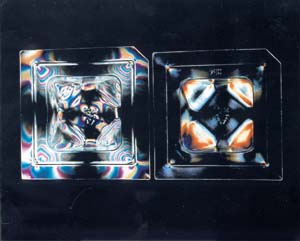
These thermoformed trays house single-use medical devices, instruments of implants that are heat-sealed and sterilized for practitioners. "The amount of inherent stress in the formed tray is a result of both part design and forming conditions. Trays with more intricate designs tend to contain more residual stress," explains Jennifer Lauderback, senior technical services engineer for Eastman. "Excessive amounts of stress can be the result of forming the part using too cold of a sheet temperature. The recommended sheet temperature needs to be at least 300ºF. Ultimately, the goal is to create a package with the lowest level of residual stress possible."
Quantitative analysis of stress patterns can be a valuable quality tool, helping thermoformers correct subtle changes in processing temperatures, residence time or cooling rates to maintain part uniformity and ensure part integrity. Stress measurement has traditionally been used to test the integrity of glass parts, but the majority of the plastics industry has been slow to embrace the technology despite its ease of use and nondestructive approach.
Observing stress patterns involves viewing a transparent plastic part between two polarizing filters. Stress in the part "splits" the polarized light into fast and slow waves in a phenomenon called birefringence, which is observed as a color pattern. The colors and patterns correlate to the degree of stress.
To make birefringence measurement a quantifiable, reproducible quality check, a polarimeter and a compensator are recommended. The compensator - a calibrated, graduated wedge - is placed in a series with the measured item. The operator adjusts the wedge until a black fringe becomes visible at the point of interest. A scale then supplies a quantitative reading.
If measurements exceed thresholds, operators can immediately adjust processing parameters. The technique is easier, cheaper and faster than X-ray, chemical analysis of other test methods. Equipment can easily be set up on-line or in a lab for testing at regular intervals during production.
For more information, contact Angie Barger, Eastman Chemical Company, P.O. Box 431, Kingsport, TN 37662, 423-229-6341, FAX 423-229-8595.
|