|
Painting Acrylic Sheet
The superior clarity and long-term durability of
acrylic sheet allow for easy painting and printing of
fabricated signs, displays and other decorative
items. However, simply choosing to use the material is not
enough to guarantee success. With
that in mind, the following guidelines
and the correct supplies will help you
produce high-quality acrylic sheet
products.
Paint
A variety of paints specifically
designed for acrylics are commercially
available. Most are supplied as
concentrates and require thinning to
obtain the correct viscosity.
 As a rule, use mild thinner consisting of an alcohol
blend, rather than one containing aromatic hydrocarbons,
such as benzene and toluene. Always follow the paint suppliers’
recommendations about the
amount and type of thinner.
Acrylic sheet’s extraordinary transparency
allows for back-painting (i.e.
applying paint to the side of the material
not exposed to weather). The
unpainted outer surface of the sheet
provides weather protection for the
paint. If you must paint the outer surface,
apply a suitable protective coating
over the paint.
Spraying Systems
Use any efficient, atomizing spray
gun system that uniformly distributes
paint. Consult your suppliers
regarding the equipment you need
for a particular application.
To obtain enough atomizing air,
the available line pressure should be
in the range of 414 to 621 kilopascals
(60 to 90 psig). Use a 7.6-m
(25-ft) long, minimum 8-mm (0.3-
in.) diameter hose to avoid pressure
drops in the line.
The air compressor should be
large enough to provide the volume and pressure required
for all spray guns.

Water and oil in the atomizing air will
spot the paint and cause uneven distribution. To prevent
this problem, use water and oil traps in the line.
Metal screen strainers at the pressure tank and spray
gun will ensure equipment cleanliness, which is also crucial
to uniform paint dispersion. Clean these items and the
spray gun daily.
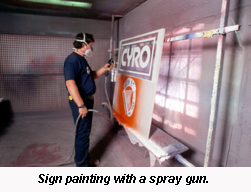
Install an adequately vented spray booth that is large
enough to house your biggest work piece. Use a light box
to judge paint uniformity on transparent plastics. Be sure
the light box conforms to building code regulations for a
spray painting area.
Fabrication Techniques
Fabricating acrylic sheet using incorrect
techniques prior to painting may cause
stress in the material. This can result in
crazing (i.e. numerous tiny cracks) after
painting. You can eliminate crazing by following
the manufacturers’ recommendations
for fabricating acrylic sheet.
Cleaning
Always clean acrylic sheet before painting.
This will remove dust and assure paint
adherence.
Use special care in cleaning, as acrylic
sheet is sensitive to solvents, such as aromatic hydrocarbons,
concentrated alcohols and ketones. Clean parts with
a solution of distilled water and 25 percent denatured
alcohol.
For stains such as those caused by oil or grease, use
stronger cleaning agents, like hexane, aliphatic naphtha or
kerosene. Make sure the sheet is fully dry before painting.
Static Neutralization
It is important to neutralize electric or static charges
that can accumulate on the sheet’s surface and attract
dust before painting. Dust on the sheet causes paint
agglomeration and uneven layers.
Since tearing the masking off the sheet will create a static
charge, all acrylic pieces should be treated with an ionizing
air gun, which safely and effectively neutralizes electric
charges. Wiping the sheet with a damp, lint-free cloth
or cleaning with a diluted alcohol-water solution is also
effective.
Avoid anti-static cleaners. They can leave a residue and
cause paint adhesion problems.
Maskants
Acrylic sheet’s paper masking is commonly used as a
protective layer while spray painting flat signs. However,
paint manufacturers also distribute liquid maskants, which
are often used to spray designs onto acrylic sheet.
Maskant is supplied as a thick liquid, consisting of
water-soluble latex resins in a solution. It is applied
through the use of air (or airless) atomizing spray equipment.
Being a water solution, it must be stored at above
0º C (32° F), to prevent freezing.
Clogging may occur, due to dried film mixed with the
solution. You can prevent this problem with a special nozzle—
available from paint equipment suppliers—that
reverses the flow and cleans out the buildup.
Spray the maskant on evenly to a wet film thickness of
250 to 300 microns (10 to 12 mils). It will dry to above
100 to 125 microns (4 to 5 mils).
Maskant Drying
Drying time is usually about two hours. However, it is
better to plan for overnight drying to assure complete
evaporation.
Using forced-air heating at 43° C (110° F) can accelerate
the drying process. Higher temperatures might dry the
surface and prevent evaporation of the water in the layers
beneath it.
To prevent dust accumulation on the plastic surface,
leave the dried maskant in place just prior to painting.
Score the design on the film, using an exacto knife, applying
just enough pressure to cut the film without scratching
the plastic beneath.
After painting, leave the film in place until the paint is
thoroughly dry. Otherwise, you will end up with smeared
paint and uneven edges.
Painting
Before painting, practice on a few test pieces of acrylic
sheet to ensure paint viscosity and air pressure are correct.
As a rule, use the lowest possible pressure to obtain
the correct results.

Too high a
delivery rate
will result in an
excess of paint
and cause
paint sag. It
can also cause
crazing of the
sheet, due to
too much solvent.
Too low a delivery rate, on the other hand, will result in dry
spray—i.e. a matte surface caused by too much dusting.
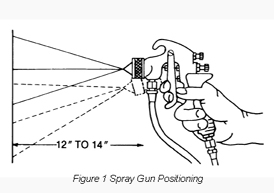
Hold the gun 300 to 350 mm (12 to 14 in.) from the
work piece; being too close or too far away will cause the
defects listed above (Figure 1).
Move the gun at an even pace and in a straight line. Its
movements should never start or stop when directly facing
the sheet surface.
Vary the direction of the spray, both horizontally and
vertically, to assure uniform coverage. Four or five passes
with several seconds between coats will provide sufficient
paint. Using a light box behind the acrylic sheet will help
you judge the uniformity and intensity of color.
Screenprinting
When used for high-volume production, screenprinting
is fast and economical. For beginners, it is best to purchase
a screen from a local screen supply house.
After set-up, apply paint with the squeegee in a uniform
and even motion in one direction. The paint will pass
through the open screen mesh, transferring the pattern
onto the acrylic.
The most important factors are the paint’s viscosity and
the size of the mesh openings. These will determine paint
flow through the screen and the paint’s appearance on the
acrylic.
It is difficult to generalize what these conditions should
be. Many different fabrics are used for screens and paint viscosity depends on the application methods and temperature.
Consult your paint manufacturer for advice
about thinning paint.
Paint Removal
If paint removal from the acrylic sheet’s surface is necessary,
it should be performed immediately. Use the paint manufacturer’s
recommended cleaner. Apply the paint remover
with a rag, then wipe off the paint using another clean rag.
Paint removers contain organic solvents. Therefore, to
reduce the chance of crazing, you should minimize the period
during which the remover is in contact with the acrylic sheet. Troubleshooting Guide
| Problem | Cause | Solution |
| Maskants | | |
|
| Weak and brittle maskant | Air bubbles in film | Dilute slightly |
|
| Film not thoroughly dry | Wait recommended drying time |
|
| Maskant film too thin | Increase thickness to 3-5 mils (10-12 mils wet). |
|
| Too much adhesion | Maskant film too thin | Increase thickness to 3-5 mils (10-12 mils wet). |
|
| Coating exposed to UV | Do not store faces outside. |
| Spray Paints | | |
|
| Poor adhesion | Incorrect paint | Use paints recommended for use with acrylic |
|
| Dirt or residue on sheet | Clean sheets thoroughly before painting |
|
| Blotches of paint | Static electricity | Neutralize charges with ionizing gun or wipe with damp cloth |
|
| Uneven paint application | Apply paint in more passes, using less paint per pass |
|
| Paint not applied uniformly | Use backlighting to check paint as it is being applied. |
| Screen Paints | | |
|
| Poor detail | Screen mesh too coarse | Use a finer mesh screen. |
|
| Paint too thin | Use less thinner |
|
| Worn screen | Replace screen. |
|
| Paint drying on screen | Hot, dry weather. | Add retarder to slow paint drying. |
|
| | Too much time between screening | Flood screen between passes. |
|
| Crazing | Stress from fabrication. | Review fabrication techniques. |
|
| | Flame polishing | Flame polish as last step. |
Notes:
Acrylic sheet is a combustible thermoplastic. Precautions
should be taken to protect this material from flames and high
heat sources.
The information and statements contained herein are
believed to be reliable, but are not to be taken as warranty or
representation for which CYRO assumes legal responsibility,
nor as permission, inducement or recommendation to practise
any patented invention without a licence.
Users should undertake sufficient verification and testing to
determine the suitability for their own particular purposes. Be
sure to follow manufacturers’ safety recommendations for
equipment and materials used with acrylic sheet.
Written by Grant LaFontaine, Sheet Products Technical
Service Manager for CYRO Industries.
For more information, contact CYRO Industries, 100 Enterprise Drive,
Rockaway, NJ 07866, 800-631-5384, Fax: 973-442-
6117, Web: www.cyro.com.
|