|
PLASTIC WELDING: Inspection and Testing of Plastic Welds
I just assume that everybody who produces something will do so to the best of his or her ability. I sure hope this is the way everybody works. But how can we be sure about the actual quality of work our employees or we have done? For example, a nice looking weld does not necessarily mean a strong weld. Many things come together to make a quality weld.
If you have been welding for a number of years and are not familiar with the basic principles of plastic welding, problems always occur. Maybe you do not realize it because none of your customers complain. Perhaps an occasional client would come back with more business if the welding job was done better. You may think, "My welds are great," maybe they look awesome, but as I mentioned, this is not an indication of a good weld. An expert may be able to see the difference between a good weld and a bad weld just by looking at it. But this is still difficult.
Unfortunately, plastic welding is not something you can learn just by doing. If you start plastic welding, I highly recommend taking a course from someone who knows plastic welding. If you read my articles, you know that it takes some work before you can call a weld a quality weld.
While all my previous articles focused on "how" to produce a quality plastic weld, this article will concentrate on the created weld. While it is always good practice to check the produced welds to be sure that the job was done right, it is not always necessary to check every weld. You and your customer have to decide which welds need to be checked and which ones do not.
I will try to keep my explanation as simple as I can while filling you in on the some of the processes of plastic weld tests. It would be too much to explain all the different testing processes in detail, so I will limit my explanations to the four most common testing methods and their basics.
·
The appropriate testing method depends on a number of factors such as:
·
What part was manufactured? Tank, pipeline, apparatuses, etc.
·
What is the purpose of the manufactured part? Water tight, pressure resistant, display, etc.
·
What plastic materials were used?
·
How much time is available to do the testing?
But testing begins before the welding job starts. If it will be necessary to test the welds for a project, the tester needs to be qualified. If the worker has no or only limited experience in plastic welding, the welds will probably not hold up to the testing procedures.
There are different ways to test a plastic weld. There are non-destructive and destructive methods. Which method is appropriate is dependent on the requirements for the finished product and the agreement between the fabricator and the customer.
Non-destructive test methods can be done by visual inspection of the weld bead in order to check its dimensions and appearances (undercuts and cleanliness etc., see Volume 22, Number 2, March/April 2001). There are also leak/pressure tests and ultrasonic testing methods. These tests allow examination of the finished parts without making separate welds.
The most common destructive test methods are the technological bend test, the tensile strength test and the tensile impact test. For these tests, special testing equipment is required. If you do not want to purchase or cannot afford this equipment, you can contact testing laboratories. These facilities, some specialize in plastics, will perform the required tests and provide you with the results. You need to supply the tester with your customer requirements and sample welds. If you own the testing equipment yourself, you need an operator who knows how to use the testing machinery. Keep in mind that the customer may require that an independent laboratory do the testing.
Regardless of the testing method, it should be performed approximately 24 hours after the last weld is completed. This will ensure that the molecular structure in the welded areas has had adequate time to set.
Leak/Pressure Test
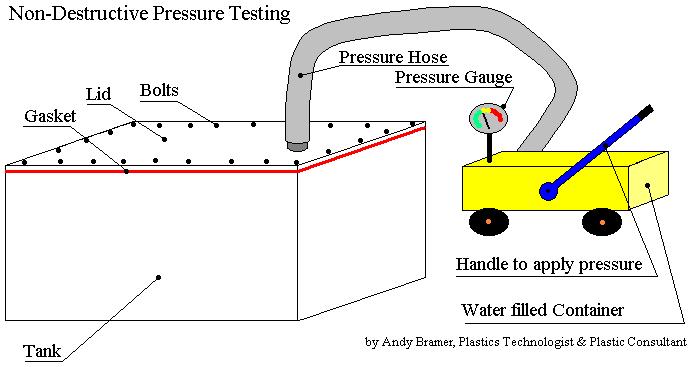
When you build a tank or a pipe system, you want it to hold the liquid for a long time. You can pressure test the container to check the welds. To do this, you have to seal the tank or pipe section. Maybe a spout is built into the tank already or you can use one built into the lid. Now the part has to be filled with water. A hose, attached to a pressure device with a gauge, is then secured to the spout. A predetermined pressure is then applied. In order to perform the test correctly, you need to know what level of pressure will be necessary. This information should be specified on the drawings or by the customer.
The tested part will need to hold the pressure for a fixed time. If the pressure holds, you can be sure the welds are watertight and meet the customer’s expectations. If not, you must find the leak and fix the problem. This can be hard, because it is difficult to see the leak area. You might be able to see where the water comes out, but this does not automatically mean that this is the leakage point. Liquids can travel a long way when it comes to leaks. This testing process would be considered a non-destructive test.

More common are destructive test methods. What we seek are the ‘yield point’ and/or break.
The yield point is the moment when the internal molecular structure of the weld or material weakens for the first time. This is usually not visible, but test machines (see following sketches) can measure it. Some materials are very flexible or very rigid and do not show a yield point at all. With these materials, you test for a break situation.
A variety of destructive testing methods are available, but most common are the following:
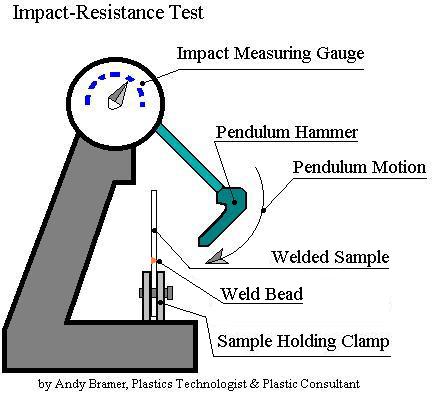
The Impact-Resistance Test
This test is the least common in the group. The test piece is held in a clamping device. A hammer-like pendulum hits the weld area with a certain, specified force. This force can be seen on an impact-measuring gauge. The system is hooked up to a computer with a program to determine the test result.

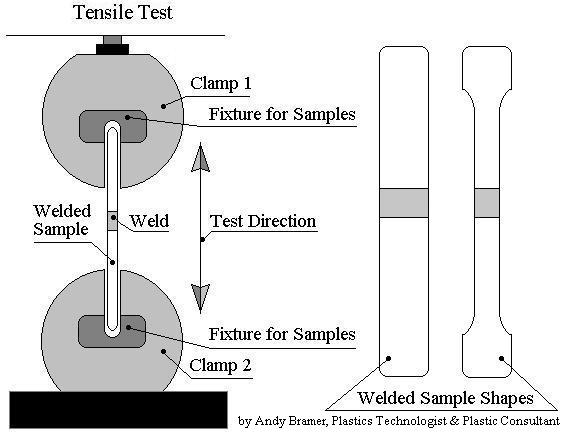
The Tensile Strength Tests
This, and the Technological Bend Test, are the most used testing methods. The Tensile Strength Test uses two clamps to hold the testing strip. When secured, the testing strip will be pulled, with a specified force, apart. The yield point and/or breaking point will be measured.

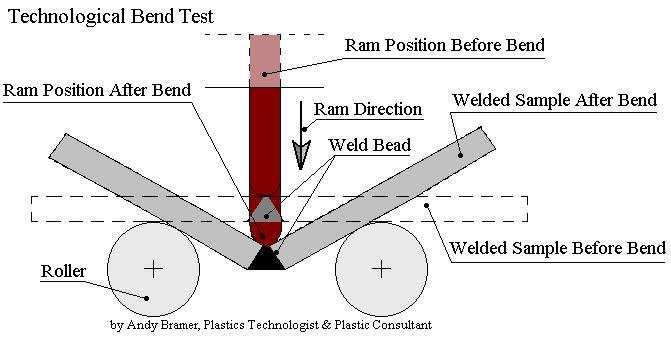
Technological Bend Test
The Technological Bend Test uses a ‘three-point-system’ consisting of two rollers and a ram or stamp to perform the test. The rollers have a diameter of 50 mm or approx. 2". The distance between the two rollers, as well as the thickness of the ram, are dependent on the material thickness.
This test measures the bending angle. Optimal would be a bending angle of 160ş. This is the maximum that is achievable, because at this point the sample will interfere with the stamp (ram). Once again, we are looking for the yield point and/or breaking point.

You can use any of these methods to test plastic welds made by commercially available welding equipment (injection, hot air/hot gas, extrusion, ultrasonic, hot plate, etc.).
This is intended to be a quick overview of the testing and inspection methods for welded plastic parts. Other test methods exist and, ultimately, the best test method depends on the type of part or apparatus being fabricated and its end use or application. Please contact me if you have questions about this article, plastic welding, fabrication or injection welding. As we have covered the major highlights of thermoplastic welding and joining in this series, we would now like to turn our focus to answering your questions and solving your day-to-day welding problems. You can forward your questions or topics for future columns to me at abramer@drader.com or contact the magazine.
For more information, click on the Author Biography link at the top of this page
|